Serving TheStage AI Diffusion models on Modal with OpenAI compatible API
If you wish to have world leading performance for diffusion models inference as the top API providers, but host models on the modal GPUs, this tutorial is definetly for you!
All necessary code is open-sourced and available in ElasticModels repository.
Serving of AI models is the final and one of the most critical stage of production deployment. Efficient serving includes the following steps:
Model acceleration. Can be done by compression and model compilation. We did using ANNA and TheStage AI Nvidia Compiler.
Model http server. Can be done by any http server. We have used TheStage AI serving framework + Nginx to setup OpenAI compatible API.
Model endpoint. There are a lot solutions to setup model endpoint. We have used Modal serverless platform to setup model endpoint.
Model monitoring. We have used Modal monitoring to monitor model endpoint.
Model logging. We have used Modal logging to log model endpoint.
Overview
TheStage AI provides optimized models for self-serving. Solution includes our internal model server and Nginx as a frontend server delivering OpenAI compatible API. Containers fully public and distributed through our public AWS ECR registry.
Note
Public AWS ECR registry has limits on anonymous downloading. Its allowed to download only 500gb per month. For bigger downloads you need to provide AWS credentials.
Attention
You can use TheStage AI pre-built images for commercial usage for free if your average usage is less than 4 GPUs per hour. Even if you occasionally use more than 4 GPUs, as long as your hourly average stays below 4, no license is required.
For higher average usage, please create a license request on our platform. Just go to service request, select “Commercial license request” and fill the form.
In this tutorial we will cover:
Install. Installation of modal and TheStage AI access token.
Modal serving setup. Setup modal serving for TheStage AI containers (FLUX.1-dev, FLUX.1-schnell, SDXL).
Multi-worker setup. Serving models with multiple workers.
Autoscaling setup. Scaling number of workers depending on the load.
Model invocation. Invoking model with OpenAI compatible API.
Benchamrking latency. Benchmarking latency of the model with different number of users.
Important notes about modal serving
Modal exposes endpinpoint on 0.0.0.0.
When container in status “cold start” modal loud balancer will not route requests to it.
When container in status “live” modal loud balancer can route requests to it.
If model is not initialized, but HTTP server is running you will can get error response.
To handle cold start we need to initialize model server first and then start nginx server.
To setup modal serving we will use the following steps:
Steps to setup modal serving
Create a new modal app.
Create a volume to cache our weights from HuggingFace.
Setup TheStage AI pre-built image.
Modify supervisord configuration to start Nginx server after model server is initialized.
Expose model endpoint through
modal.web_serverdecorator.Create modal function and specify GPU type.
Run modal serving in a signle GPU. It will cache weights from HuggingFace and will not create concurrent writes to the volume.
Invoke the endpoint with OpenAI compatible API.
Scale up to multiple GPUs.
Single GPU setup
You should be registered on Modal and have access to their platform.
pip install modal
modal setup
Now we need to setup TheStage AI access token. Generate your access token on the platform and setup through CLI:
pip install thestage
thestage config set --access-token <YOUR_ACCESS_TOKEN>
Install OpenAI client:
pip install openai
Prerequisites
Currently we support: L40s, H100 and B200.
Python 3.10-3.12.
The whole implementation will consists of 3 files:
modal_start.sh- script to start model server and pass internal modal arguments properly.supervisord.conf- Supervisor configuration to start model server and Nginx server after model server is initialized.modal_serving.py- modal app, function and web server.
Setting up modal launch script
Let’s start with the first file modal_start.sh:
#!/usr/bin/env bash

# strict error handling, exit on error
set -euo pipefail
# start supervisor (model server and nginx server)
supervisord -c /etc/supervisor/supervisord.conf &
# execute modal function start
exec "$@"
That’s it. We will use this script to start model server and nginx server. The next step is to setup supervisord configuration, the most important part of the setup is to setup priority to start model server first and then put nginx start to the sleep loop until model server is initialized.
Setting up modal app and function
The second file is modal_serving.py:
import modal

app = modal.App("modal-thestage-diffusion-serving")
# TheStage AI pre-built image (supports L40s, H100, B200)
IMG = "public.ecr.aws/i3f7g5s7/thestage/elastic-models:0.2.0-diffusers-24.09c"
Create volume to cache our weights from HuggingFace, so we don’t need to download them every time:
HF_CACHE = modal.Volume.from_name("hf-cache", create_if_missing=True)
Now we need to setup environment variables for our model:
ENVS = {
    "MODEL_REPO": "black-forest-labs/FLUX.1-dev",
    "MODEL_BATCH": "4",
    "THESTAGE_AUTH_TOKEN":,
    "HUGGINGFACE_ACCESS_TOKEN":,
    "PORT": "80",
    "PORT_HEALTH": "80",
    "HF_HOME": "/cache/huggingface",
}
Setup TheStage AI pre-built image. We just need to add our startup script and supervisord configuration, then set entrypoint to our startup script:
image = modal.Image.from_registry(
    IMG,
    add_python="3.11"
)\
    .env(ENVS)\
    .add_local_file("modal_start.sh", "/usr/local/bin/startup.sh", copy=True)\
    .add_local_file("supervisord.conf", "/etc/supervisor/supervisord.conf", copy=True)\
    .run_commands("chmod +x /usr/local/bin/startup.sh")\
    .entrypoint(["/usr/local/bin/startup.sh"])
We are ready to create modal function and web server. We will use H100 GPU, 10 minutes timeout, 600gb ephemeral disk to store model weights and volumes to cache HuggingFace weights. You can pass also instead of H100 L40s or B200 GPU:
@app.function(
    image=image,
    gpu="H100",
    min_containers=1,
    max_containers=1,
    timeout=10000,
    ephemeral_disk=600 * 1024,
    volumes={"/opt/project/.cache": HF_CACHE},
    startup_timeout=60*20
)
@modal.web_server(
    80,
    label="flux-dev-blackwell-test",
    startup_timeout=60*20
)
def serve():
    pass
Image warmup and model caching
Now we are ready to run our modal app for the first time.
Note
To avoid concurrent writes of HF weights to the volume first run modal app with a single worker.
Run the following command in your terminal:
modal serve modal_serving.py
After the first run, model weights will be cached to the volume and next runs can be done with multiple workers. Usually, container built and model weights cached in 10-15 minutes. After that cold start time will be around 60 seconds.
When model server is initialized, you will see the following message in the logs:
I1006 20:32:01.804318 100 grpc_server.cc:2558] "Started GRPCInferenceService at 0.0.0.0:8001"
I1006 20:32:01.804562 100 http_server.cc:4704] "Started HTTPService at 0.0.0.0:8000"
I1006 20:32:01.859528 100 http_server.cc:362] "Started Metrics Service at 0.0.0.0:8002"
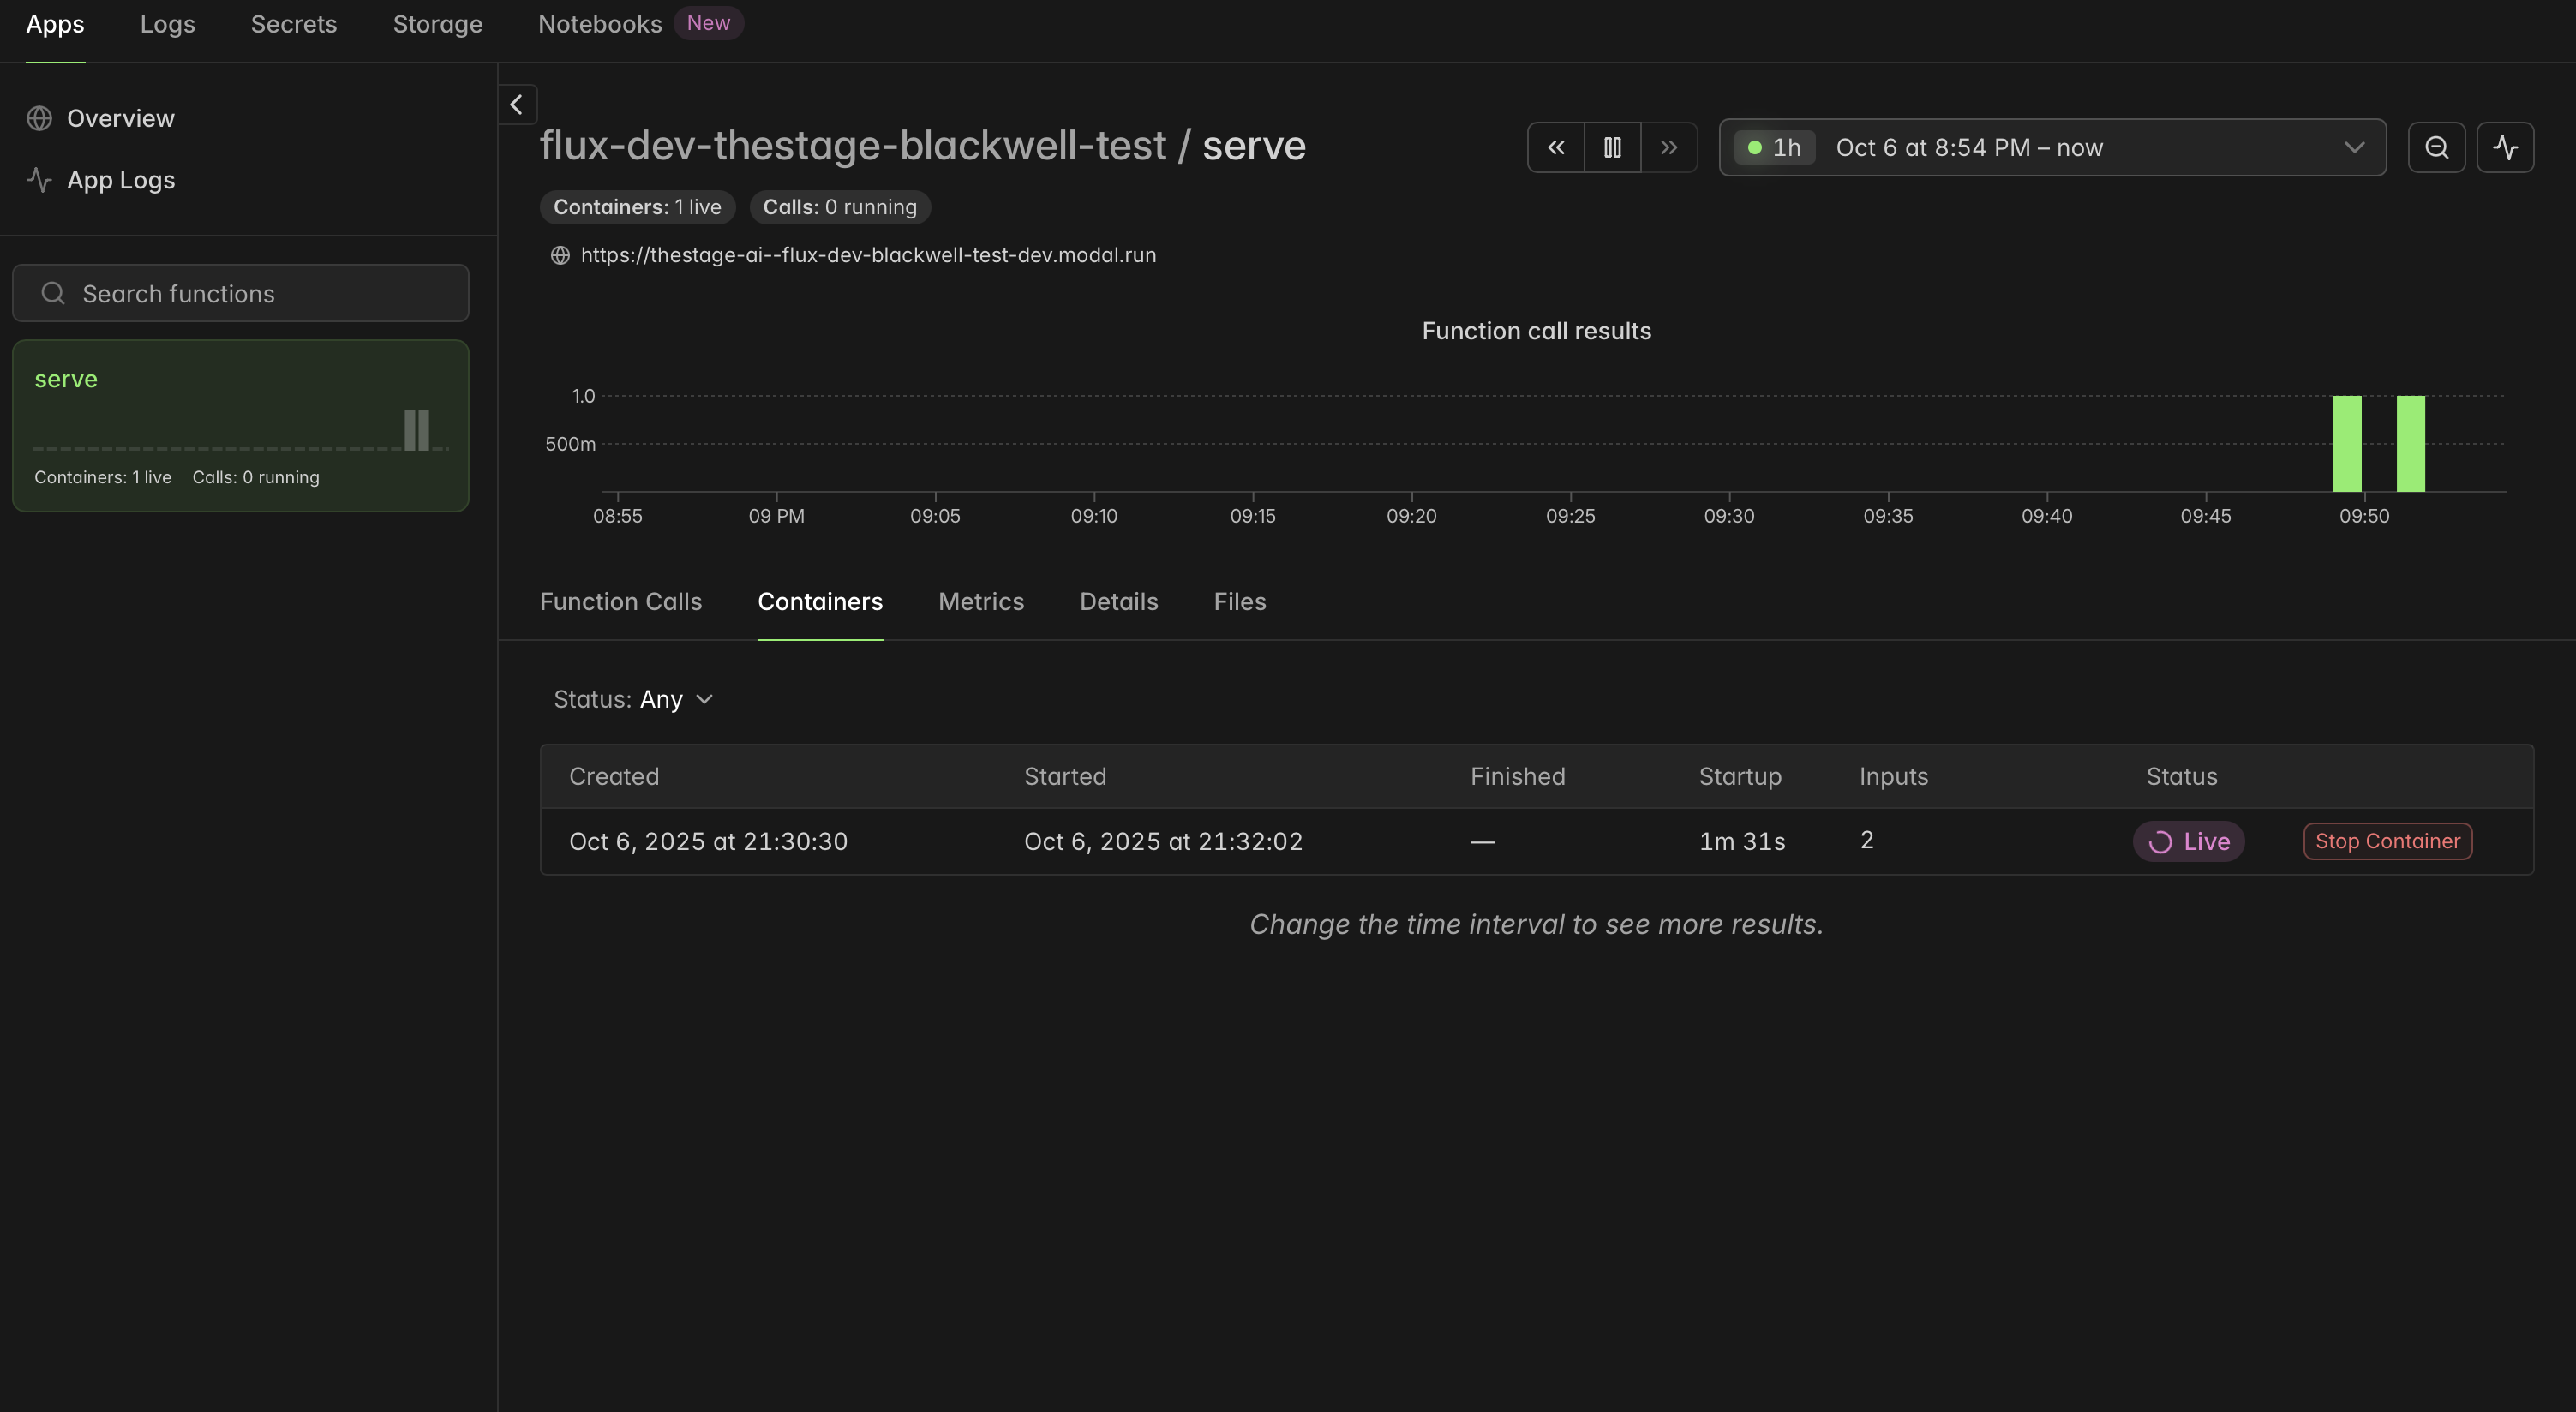
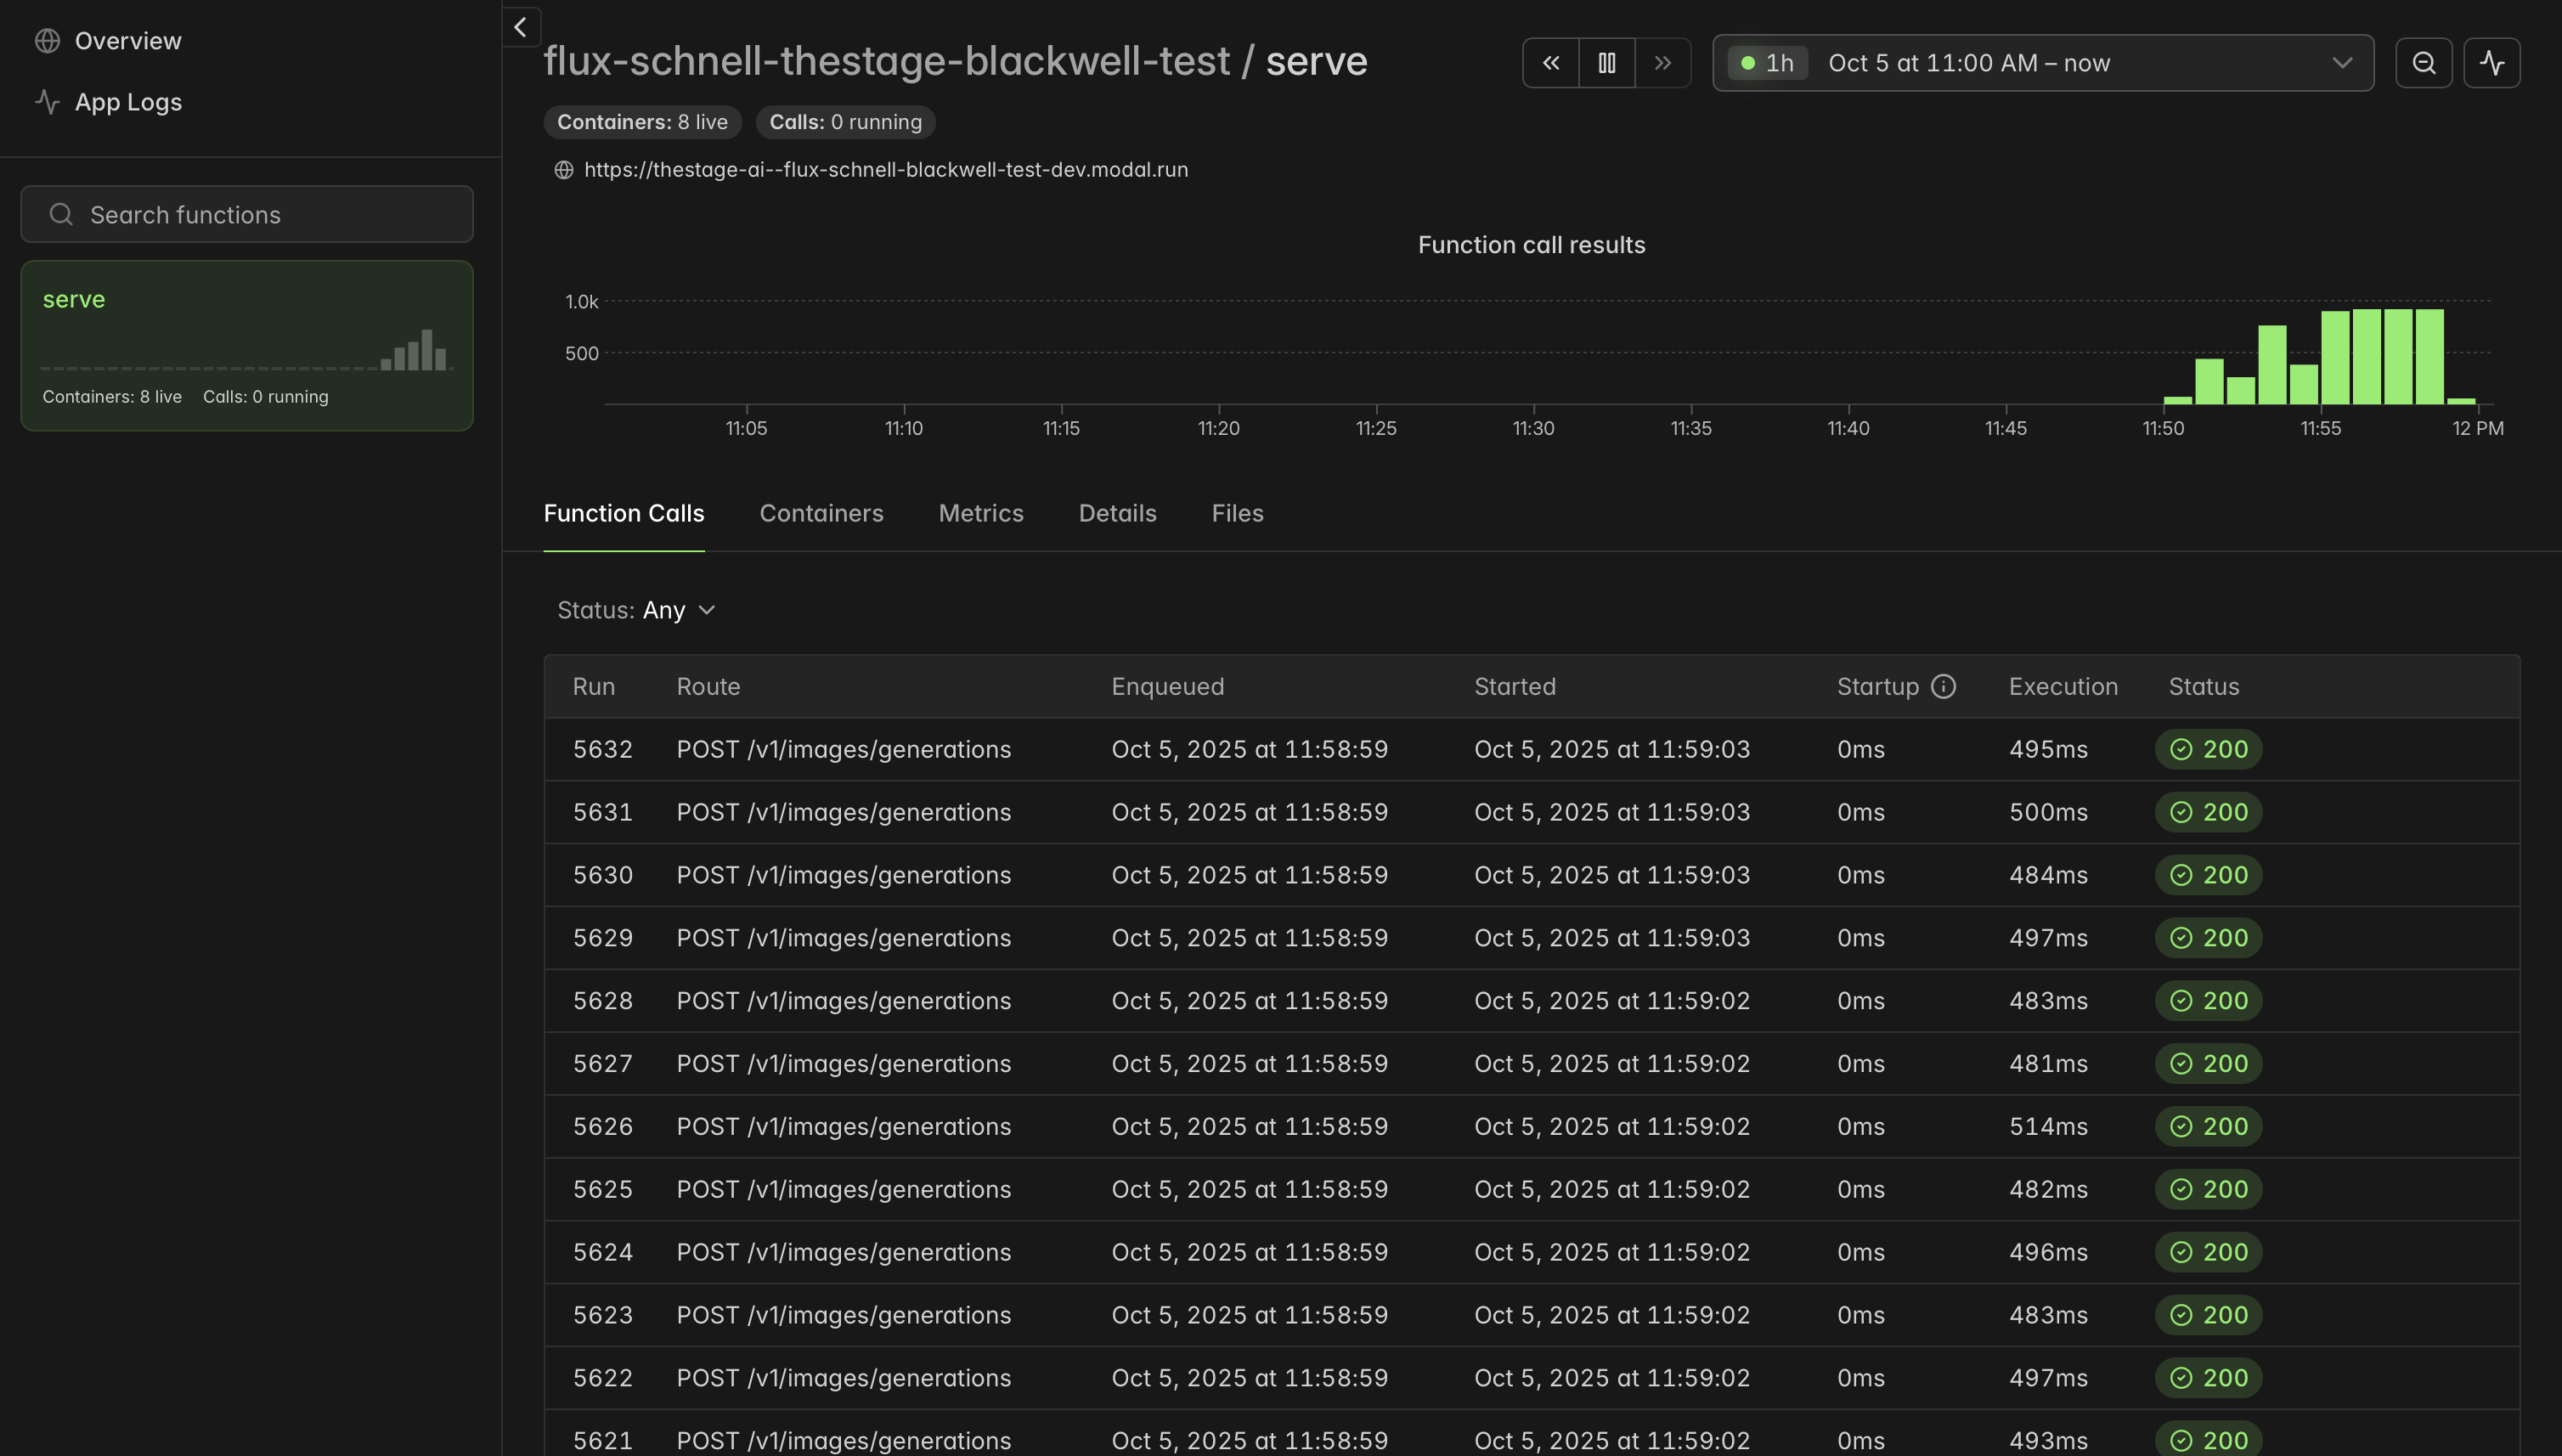
Also you will see your endpoint in Modal dashboard:
Invoke model endpoint
You can test your endpoint with curl:
curl -X POST https://thestage-ai--diffusion-dev.modal.run/v1/images/generations \
    -H "Content-Type: application/json" \
    -H "X-Model-Name: flux-1-dev-s-bs4" \
    -d '{ \
        "prompt": "write `Modal` on a beach, make realistic photo", \
        "seed": 111, \
        "aspect_ratio": "1:1", \
        "guidance_scale": 3.5, \
        "num_inference_steps": 28 \
        }' \
        --output modal_blackwell.webp -D -
You can also use OpenAI client:
import os, base64, pathlib, json
from openai import OpenAI

BASE_URL = "https://thestage-ai--flux-dev-blackwell-test-dev.modal.run/v1"
API_KEY  = ""
MODEL    = "flux-1-dev-s-bs4"

client = OpenAI(
    api_key=API_KEY,
    base_url=BASE_URL,
    default_headers={"X-Model-Name": MODEL}
)

response = client.with_raw_response.images.generate(
    model=MODEL,
    prompt="write `Modal` on a beach, make realistic photo",
    n=1,
    extra_body={
        "seed": 111,
        "aspect_ratio": "1:1",
        "guidance_scale": 3.5,
        "num_inference_steps": 4
    },
)

with open("modal_thestage.webp", "wb") as f:
    f.write(response.content)
You should get the following image:

Configurations! Now we are ready to scale up to multiple GPUs.
Multi-GPU setup
To set up a multi-GPU configuration, you need to adjust the modal function parameters to utilize multiple GPUs.
Fixed number of GPUs
Lets say you wish to use 8 H100 GPUs permanently. You can do this by modifying the min_containers and max_containers parameters in the @app.function decorator:
@app.function(
    image=image,
    gpu="H100",
    min_containers=8,
    max_containers=8,
    timeout=10000,
    ephemeral_disk=600 * 1024,
    volumes={"/opt/project/.cache": HF_CACHE},
    startup_timeout=60*20
)
@modal.web_server(
    80,
    label="flux-dev-blackwell-test",
    startup_timeout=60*20
)
def serve():
    pass
Autoscaling setup
To optimize costs, you can also set up autoscaling by adjusting the min_containers, max_containers and scaledown_window parameters. For example, to scale between 1 and 8 GPUs based on demand, you can configure it as follows:
@app.function(
    image=image,
    gpu="H100",
    min_containers=1,
    max_containers=8,
    timeout=10000,
    ephemeral_disk=600 * 1024,
    volumes={"/opt/project/.cache": HF_CACHE},
    startup_timeout=60*20,
    # Scale down after 5 minutes of inactivity
    scaledown_window=300
)
@modal.web_server(
    80,
    label="flux-dev-blackwell-test",
    startup_timeout=60*20
)
def serve():
    pass
Benchmarking latency with different number of users
For benchmarking latency of the model endpoint with different number of users you can use locust.
Prerequisites
Install locust plugins:
pip install locust-plugins.Get file
locust_flux-dev_bs4.py/locust_flux-schnell_bs4.pyfrom here.Modify model name and endpoint in the file
locust_flux-dev_bs4.py/locust_flux-schnell_bs4.py.
Lets create 8 static workers and run benchmark with different number of users. Run the following command to benchmark latency with 16 users and 512 iterations for Flux.1-dev model:
python3 -m locust -f locust_flux-dev_bs4.py \
    --headless -u 16 --iterations 512 \
    --html report_b200_flux-dev_8w_32u.html \
    --csv stats --logfile report_b200_flux-dev_8w_32u.log
To run benchmark for FLUX.1-schnell model just use the file locust_flux-schnell_bs4.py and modify model name in it.
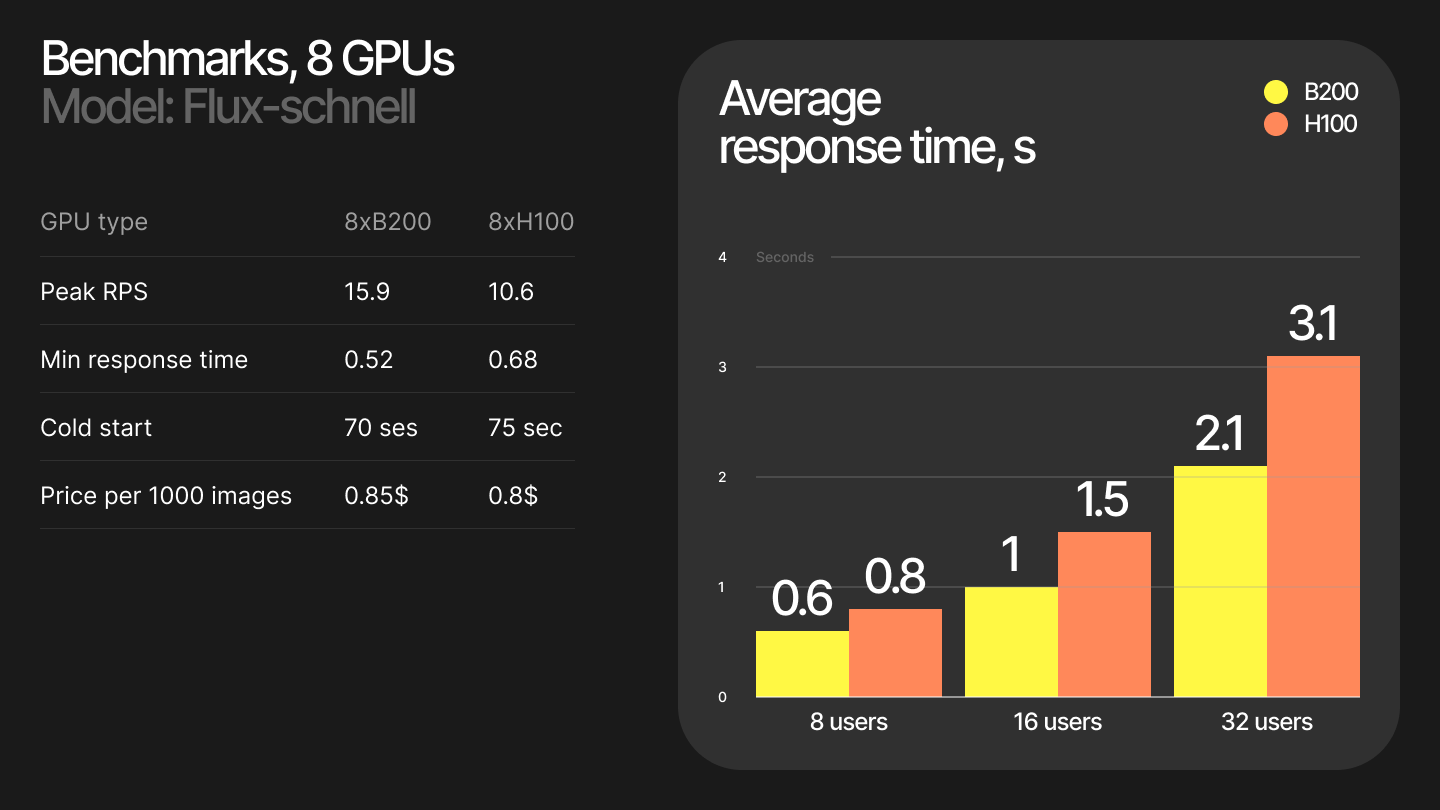
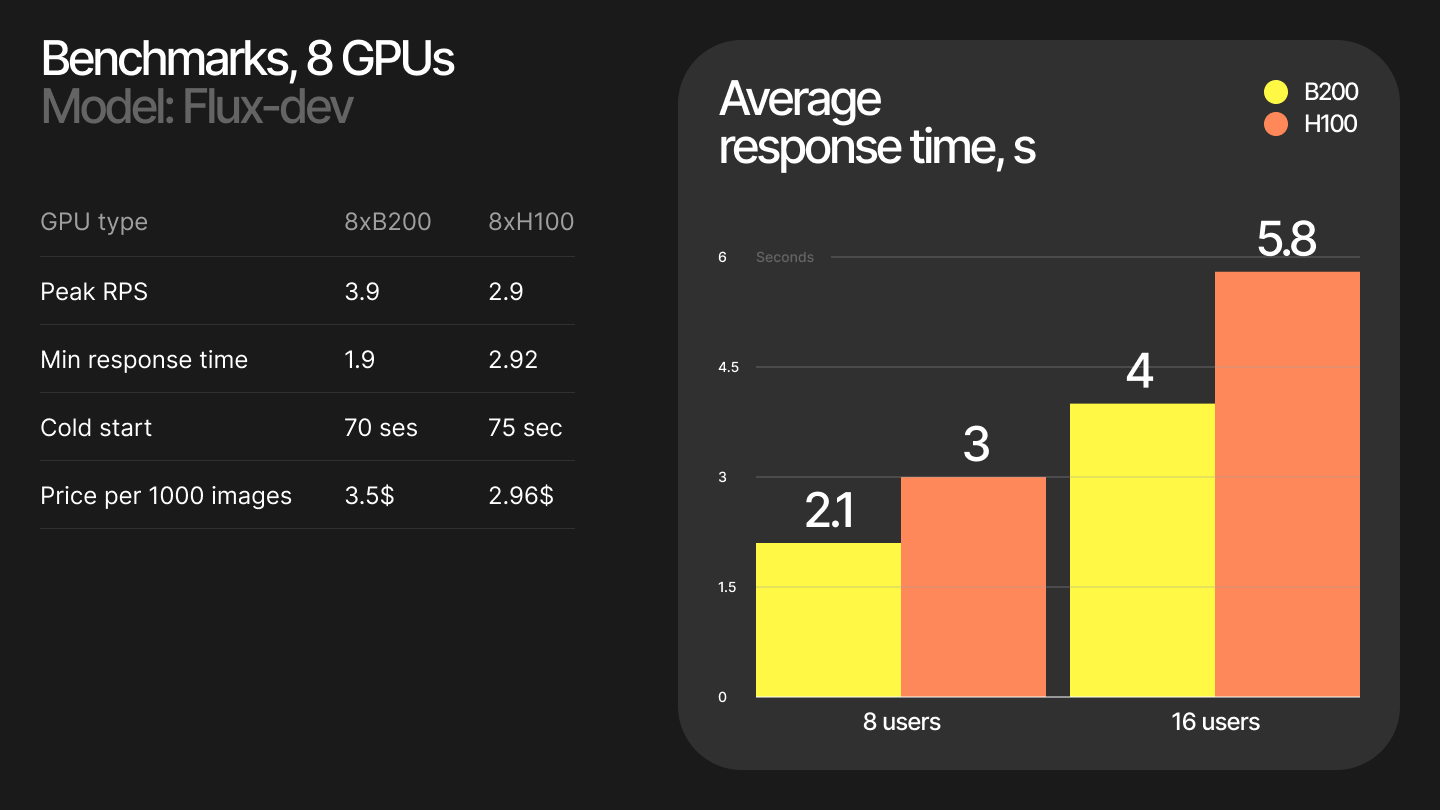
We have run benchmarks from USA East region and get the following results:
You can also monitor your endpoint in Modal dashboard:
Future improvements
We are working on the following improvements to make model serving even more efficient and reliable:
Faster serialization - We are working on improving the serialization and deserialization of the model to reduce latency.
Faster cold start - We are working on reducing the cold start time of the model server by faster model deserialization.
Faster model optimization - We are working on optimizing more models for better performance.
More models - We are working on adding more models to our pre-built images.